Wednesday, 31 May 2017

Kitchen and cupboards


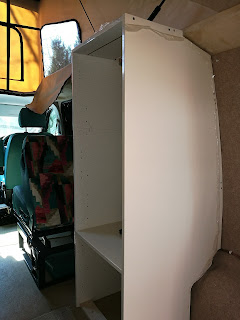
Been a while but building the kitchen unit was easy enough but the tall units for the Fridge wardrobe etc was (is) fun ..........not!
Angles and narrowing of the van towards the back have been a pain but nearly there. I have bought Tambour Doors for the cupboard next to the oven, for the rear access cupboard and the one above the fridge, expensive but weigh nothing compared to using the panels! and being sliding no banged heads or trying to get around them etc as you would have to do with standard doors!

So below are the units thus far !

The Loo will be partly covered and a unit will be built above for toiletries and box in the electrics. The cupboard door will swing out to give a modicum of privacy! Porta Potti do a floor bracket for this model so it is secure as is but can be easily lifted out if needed. But it can be used in situ !


The carpeted wall behind the kitchen unti will be sorted last as we haven't made our minds up what to put there, maybe coloured perspex or clear so we can fill it up with photos from our meanderings!


Sunday, 14 May 2017

Bit more work on the cupboards

Getting there just got a couple of "pelmets" to do to cover the roller on the Tambour doors. Weight saving allows a bit more drawer space over standard cupboard doors.

Tuesday, 25 April 2017

Fiamma Roll out Awning


When we had our T25 we always wanted one of these awnings but price was out of our reach!
As always things are never simple with this build. Many emails back and forth with Fiamma agent! We settled on the F45 S 300 in black so it would blend a bit!

Because of the scissor hinge set up on our pop top (it is fairly normal these days because it gives a bit more room at that end!) means the brackets do not fit at the end. A lot of cutting and re drilling is required which I felt on receiving the fixing kit made things weaker for such a long awning. In the end I fitted the front bracket as per instructions. The "end" bracket was fitted  as far to the rear as the OEM fixing would allow just over half way back. I also found that someone had done more or less this for similar reasons. Once fitted there was far to much "awning" to the rear of the middle bracket so I needed to make a bracket to stabilise the end of the awning.
Was a bit of a fiddle and I have not got the bracket as perfect as I would like but if it works with no stress factors I'll make another one! By bending it and having a couple of angles instead of just one it is pretty solid. The OEM brackets use 6 mm bolts, only one per bracket so I have used a 8 mm bolt and so far all is good!
I've still to roll it out in full as do not have the room to do it, but there is a business area close by so will take it down there to play

Rear bracket including yellow sand from overnight rain!


Front OEM brackets a lot neater but mine is tougher lol


Monday, 10 April 2017

A bit of bling


Fitted the running boards over the weekend, Instructions were complete rubbish! rear brackets were listed as front, nearside was offside etc etc so first one took hours sorting what went where it was a nondrill fitting set up which is good but means removing the plastic covers underneath. Thankfully I fitted the bars before cutting the plastic covers as again cutting to the instructions would have holes where I didn't need them. I accept that its a new van model but come on peeps!
Also bought a chromed stainless steel re hatch step cover and matching handle cover, the tread plate wont get fitted just yet or I'll probably scratch that as well lol

Sunday, 2 April 2017

Underfloor LPG Tank

Finished fitting the underfloor tank today, was fun ......not, as in fitting the brackets to suspend it!
Downside was having to cut hole in the inside floor to facilitate fitting the bolts, "inspection hatch" thank god for my Bosch multitool!
I fitted one bracket then slid the tank into that and mounted the second bracket, very fiddly and not a lot of room for movement, read blind fitting one bolt!
Still bonus is a freed up cupboard space, which will be the boot!
To run the pipework I had to remove the rear plastic cover and the spare tyre, which was never wanted in the first place! I'm still looking to use the spare tyre cradle for the watertanks, but we'll see! Might be easier to remove it and strap tanks in place.
I'll leave it all to settle and joint cement to harden before putting a few ltrs of lpg in tank to test for leaks.
Pictures to follow when done.

Sunday, 26 March 2017

Fridge in place


Got the carcass for the fridge in place today, glued and screwed where possible. Then fitted the fridge (Waeco CRX 65) Tested and working!

Also drilled the mounting holes for the underfloor gas LPG cylinder. They came up right in the middle of the gangway! So I will have to make an inspection hatch as will need to fit load spreading washers etc. And access will probably be needed sometime etc.

Forgot to wire in the 240/120v transformer for the fridge before fitting the fridge so I will need to remove top shelf and hope I can access the plug or will have to pull the fridge out!!!

It allows the fridge to run automatically when hooked up to mains on sites. it senses the mains and then runs fridge on that. useful when parked up for a while and using the motorbike to travel.


Tuesday, 21 March 2017

New Leather and cloth seats

New seats covers done by Vision Leather Upholstery
It has taken a while as the company that supplied the cloth inserts took months to send out the material.
It was a gamble colour wise but we are happy modern but a nod to retro in the colour scheme


Rear RIB single seats covert to two singles or a double