Thursday 10 November 2016

Rear tow bar change


I requested standard towbar I got a swan neck fixed! Factory fitted welded swan neck!!!
So to be able to fit my motorcycle rack I needed a STANDARD towbar!
Managed to get one from Towsure for £100  so that's not  bad! Plus hopefully I'll sell the OEM for that least!


Fitting:
First hassle: getting the spare tyre out, first time in my life I've needed a handbook to undo two bolts!
Still got there in the end, wheel wrench is used to apply pressure to the captive bolt downwards via a slot for the wheel wrench!
Then removed the plastic rear chassis cover.
Remove the rear light clusters
Remove the plastic panel under the light clusters
Then the bumper two screws under each wheel arch at the bottom which basically holds the whole bumper in place!
Carefully pull the bumper outwards on each side to release.
Along the the top of the bumper there are slots using a large flat screw driver push down to release the top of the bumper.
On the bottom of the bumper there are some plastic stays held by plastic push rivets undo these.
If you've got reversing beepers you might have to release three, start from offside then the last can stay attached to the bumper and main loom.
Fitting towbar a doddle arms slide into chassis and bolted
Then it's time to put it all back together

Sunday 23 October 2016

First sliding door card

This was basically not fun!!
8 hrs give or take to get this stage measuring- cutting- measuring-cutting - swearing etc.
When glue all dry and my back is functional again, it'll be fitting one more time to see if any of the inside face if panel shows through window when open , which I think some part probably will . I'll then have to find a way of making a frame albeit cloth or wood so it looks neat from inside.
Never expected it to be easy but bloody hell !


Update: 05/11/2016

Once the panel was fitted it did not look right that great expanse of cream suede! Also as the doors get a lot of use I feel that it will get grubby very quick! 
I'm changing the headlining to vinyl as again it could become grubby very quickly, we've chosen lighter shade of cream when its re applied we will look again and maybe use the same vinyl for the two sliding door but look at putting a different coloured panel in the middle to break up the "slab of beige" 
So when the seats have been re upholstered in a couple of weeks we will look again!

Tuesday 18 October 2016

And Closed!

Rear Hatch Curtains

Vanx rear hatch curtains...........

Fairly easy to fit, for the top rail I had to shorten it by about 5" then drilled centre hole and fitted it, it needed a slight bend inwards. Then marked and drilled 4 more holes.
I then fitted the curtains, these are black out and stretchy so you need to position the bottom rail low enough to allow the curtains to sit slightly under tension. This rail I needed to bend a small amount again to match the curve. Again centre hole first etc.
The small plastic end caps on the top rail are a pain to fit. I would suggest fitting  one on before screwing into position.

The stud fasteners are then mounted in position to keep the outside hem against the frame. The screws provided are to long for the T6 so I used pop rivets .
Very happy with them.

Monday 3 October 2016

Rear hatch panel

Covered the rear panel today, we've decided on black out curtains for it as can't seem to get pleated blinds in, even close , to the right size.

Saturday 17 September 2016

N/S Sliding Door Card

First rough cut door card.
It's a little flimsy door handle side but when the blind supports are fitted top and bottom and it's all fitted lined etc I don't think it will be a problem . But I might glue a wood brace along it. We'll see!
I used the oem door card as the template then just measured and cut the top section. Once that was right I fitted the new card , traced around the top from the outside, opened the sliding window to get half the opening and drew around the aperture this gave me exact opening I want.
Then lined it all up and cut it.
I've used 3 mm hardboard, bit of a gamble but when secured it'll be strong enough and the oem one is thinner hardboard .
When all is neat and tidy I'll reverse it and use as a template for offside slider.
There's more than enough space to fit a pleated blind in the aperture as well.

Sunday 11 September 2016

Gas Box

Temporary sealed door for gas locker. When furniture boards turn up and I've made the kitchen I'll make a hinged door so it blends in . I should also have enough space on top for a removable drawer, for EHU cables and suchlike. But it is usable and safe as is!
What I did forget is that the cylinder had a fuel gauge on top! Thank goodness for modern mobile phones!
Just take a picture!

Didn't last used to much space inside I've fitted a 25 ltr tank under the van the space will now be used for storage a sort of  "boot space" !

Wednesday 7 September 2016

We have fire!

Jumped a couple of hurdles today!

1) put a fivers worth if LPG in the tank (5 ltrs) ! And didn't blow myself or the garage up!
2)  Fired up the Propex heater!

Started at the filler connection checking for leaks, then at regulator and then the connections to the Propex heater.
The only leak was on the heater quarter of turn sealed it nicely.
Then a few minutes of biting my nails whilst it sorted itself out. And then it fired up blasting a jet of heat cross the van.

I choose Propex as we are fairly unlikely to camp out in winter so it doesn't seem worth spending a lot of money on an eberspacher system.
If we do need heat at current price of 56p a litre! There's no contest and plenty of garages that do LPG in UK and most places abroad !

We had Propex in our T25 and once or twice used it in the winter and we just set the thermostat on low to keep the chill off and I see on the thermostat there is a frost setting now! So even better.

Tuesday 6 September 2016

Hooking up LPG

Today my hole cutter turned up (70mm) so I could cut the hole for the LPG filler assembly ( gulp) As it turns out cutting the hole was the proverbial piece of p!

Life would have been simpler if I hadn't glued and screwed the box containing the gas cylinder in place.

I got there in the end but it was a pain in the elbow knees and back! Why is it the the most difficult pipe to connect in the most awkward place to get at?

I also needed to remove the carpeted panel as I needed to make a hole large enough to service the pipework attached to the filler cap.

Order if work:
Remove carpeted panel to access outer panel to position the filler cap
Remove insulation
Drill hole to accept filler assembly
Install filler assembly
Attach hose to filler
Attach the hose to LPG tank
Attach filter assembly to outlet regulator
Attach regulator to outside of LPG box
Position 3 gang taps and connect pipework to regulator for supply
Run pipe from Propex heater to supply ( that was the awkward pipe!)
Clean up and secure all!

Next: I will be building a door for the LPG box that needs to be sealed, At the moment I'm waiting on the metal panel door to adhere to the 5mm MDF panel! Then need to find away that seals it in place when shut!

Hole cut in side of van!


Filler assembly in place along with warning sticker, prior to fitting it I painted some Dinitrol around the cut edge and allowed it to be touch dry before mounting the filler


From inside the van insulation back in place around the filler point


The hole in the carpet liner was a little trail and error to give me access for servicing so I cut a piece at a time until I had a larger enough hole to get a spanner and my hand in!


Regulator and pipework run and fixed in place with easy access as the whole thing is lower than the work surface will be, so I am hoping to build a pull out drawer (read who knows) to easily access taps etc when on the road which also might give a bit of storage as well ( mains cable and the alike)


HRH Merlin our now very ancient (16 yrs old this September)  Ragdoll Cat giving the van the once over it passed with a royal sniff as he got out!


Thursday 1 September 2016

Using up the remants of carpet!

Won't be any of it on view when units in but it's an extra layer of insulation!

Wednesday 31 August 2016

Cost cutting

Priced up the lightweight furniture boards  I would need to build the kitchen and cupboards.
£720 Inc delivery.
B&Q have an online sale on!
I decided on cream gloss for the majority of panels with mint gloss accents some draw fronts etc.
I'm having a rummage on B&Q website and they've reduced nearly all the end panels in cream gloss. So some working out later and a bit of math re weights etc. I ended up buying 6 tall end panels and 6 standard height end panels all cream gloss and at a cost of £284 with free delivery! As with the lightweight board fittings are extra and we might need to rethink drawer fronts as couldn't find a pale mint but there's always spray paint! So I reckon I'll be able to build the units complete for the same or less than just the lightweight boards!

Weight of the panels vs boards:  the panels were about 30 kg heavier but I'll be cutting a fair bit out so if I remember I'll weigh the panels to get exact comparison.

View to the rear

Hatch posts

Eee what a palaver! Still that's finished ! So just doors and hatch to cover, if and when we sort the blinds but either way seems it just might be curtains at back as so called made to measure .....don't do made to measure in the old fashioned sense you can have what you like within colour and size they want you to have!
I emailed one firm to ask what the actual width of the pleat was a week later no reply!!!!

Tuesday 30 August 2016

Hatch posts

Started on the final hatchback posts just got the top rail to do, but it'll mean removing the (or hopefully just unscrewing the bottom part!) Light pod / upper bed box.
So that can wait until tomorrow!

Monday 29 August 2016

Handbrake

Just need a decent handbrake grip and decide black leather or cream suede gator!

Thermal Screen

Was looking for something other than plain or with eyes in! Came across Vanshades on tinternet they allow you to send in your own designs and within reason can reproduce onto the screens.
Seeing as my van is black, I like Daffy Duck and remembered one cartoon where they ended before Daffy was ready and they showed him trying to get from behind the screen.
Job done and so there it is ! Excellent
PS I know he's not real !

Handbrake cover

Building the cover for the relocated handbrake
3mm ply from my heap of scrap! Glued and stapled.
I've notched it for the two lugs on the main frame of the handbrake mount.
We'll see if I need a further securing bolt,screw whatever!
Probably ha ha

Saturday 27 August 2016

Gas supply

There seems no hard and fast rules out there for self build gas fitting.
I've spent hours wading through data which basically aimed at business builds.
So I've gone with using 2mm mild steel, backed with 3 ply. Glued and screwed to form a small enclosure as possible.
It's mildy amusing that all has to be sealed especially the door, when you have to have an opening for the pipes to units and filler cap!
So when glue and paint dry ( used a can of metal spray for interior of box)
I'll position it for the drop hole and cut the filler hole (70mm) in side of van.
I haven't made my mind up about the door as once all in place I'll only need to access the bottle and pipe work for servicing so can't really see the point in having it on hinges to open, maybe some simple hooks at the bottom  and latch at top

Sunday 21 August 2016

Melton Mowbray

Trip to see family and show off the van
Mpg ave 40.9 not bad , haven't quite done 1K yet.
Comfortable quiet and back to being able to see over the hedges again!

Saturday 13 August 2016

Front B to C posts done

Just the back to do!

I can see why people use the carpet to line vans!

The faux suede is a pain! Ha Ha

Friday 12 August 2016

Nearside Doorframe covered

Decided to make a start on the roof sub frame and B post nearside lining.
The suede is a bit if a pain as you have to be very careful to press the cloth to the frame not using your fingers! If not careful you'll find that the glue soaks into the cloth and leaves small indents!

Anyway had to pull the B post plastic covers away and undo top seatbelt bolt.

And then rescue one of the hidden fitting studs from the depths of the post!!!

I had a few pieces of the suede left over and luckily there was enough to cover the B post.

I first did the sub frame which is a bit of a tricky shape by the B post and as the suede DOES fray!! Needed to put a 5mm hem where it joins the upper bed carpet. We were going to hem it ( stitch) but had a play with a couple of left over remnants. And if you protect the cloth and spray carefully it was fairly easy to fold the small hem over and stick it down. Key here is carefully and slowly giving the glue about a minute before folding. Worked well.
So removed the door rubber enough to work the cloth.
Stuck the hemmed edge to the side of the subframe first let it set before smoothing it down along the length whilst doing the shaped end by B post.
Then glued the rest down and replaced the door rubber at the top. Best way to do this as you want it to trap the cloth as well is replace it by pushing it from inside at an angle that allows it to open slightly under pressure which allows it to overlap the new suede.  Works fine
I then did the B post easy job this time found that gluing the frame from the door rubber lip inwards worked fine.
Put all back together was fine.

To get around the LED lights as they are wired into the sub frame. Was to remove the " bulb" then remove the light frame ( two screws) then cut the cloth in straight line just smaller than the frame and push it though. Then mark the screw holes before then stick the cloth. Just a case of rethread the wires back into the frame and screw back onto the cloth.

Thursday 11 August 2016

Wednesday 10 August 2016

De Badged !

Plastic scrapper
Hot airgun
White spirit
Colour T cut
Hi Gloss car wax

Took about an hour to remove ,wash and wax

Saturday 6 August 2016

We have mains electrickery!

Nothing runs off it mind lol!
At the moment any way , I will probably get the Waeco mains adapter for when we are parked up on holidays . But this is as complicated as my 12 & 240 volt set up will get. The solar panel gauge show volts in and out and the leisure Battery is directly wired to the solar panel. That will always keep it reasonably charged ( 140amp panel) 7 LED lights are also wired directly to solar panel when all on it shows a load of just 0.1 amps.
When we had zig units and gauges everywhere only time I took any notice was when something went wrong!
We've never used all power up on the leisure Battery even on 80's tech !
Don't go on holiday to watch TV even in this country so as long as the fridge works .............

Tuesday 2 August 2016

Fridge

Got a good deal on the new CRX 60 Waeco, the extra 10 Ltr capacity is in the depth. Which means the offside cabinets will need to be 60cm deep to allow the air gap etc. I'm fitting it over the wheel arch when I build the cabinets.

So decided I'd temp wire it today, at full throttle it's not that noisy you'd hear it at night when on but the new built in fan is quiet .

We will probably go down to Cornwall in September for a week so will take the fridge (strapped to the rear seat frame for travelling!) And slum it in our posh new van ha ha!

Sunday 31 July 2016

Re Wire

Initially I kept all the wiring outside of the panel convincing myself that if I needed access it would be easier! Self doubt I suppose. But today I'd had enough it looks untidy and unprofessional to me so I decided to run it all behind the panel!
I haven't screwed the panel on properly thank goodness. So it was easy enough to release.
I had to undo the the two positive and one negative lead from the box which is a bit of a pain, but I took a photo and numbered the positive wires.

I've run the wires through the small grey plastic panel at the bottom of the C post.
If you follow the line of the wheel arch inside you'll find an opening which will enable you to bring the wires up and into the middle section of the lower panel . I then just routed the wires between the Dacron insulation to the end and out through a convenient hole to the electric box.
It now looks a lot better!

Friday 29 July 2016

Mains wiring

So, we have 240v input! Didn't want to cut a hole in the bodywork so opted for the continental version under the rear bumper.
Thought about it a lot , wet knees, grovelling around etc etc. But actually it's not that bad don't actually have kneel to attach mains cable.
Had to drill one hole through floor inside, the rest was routing the cable away from exhaust and make sure cable wouldn't rub on any metal work.
I've run one cable under the wood floor to the nearside for a domestic plug not sure where it will be placed but will wire a socket onto it so I can get an electrician to check it and certify it for me ( Mr Butt this hopefully means you if your reading this ha ha) plus I need a cable to connect it to mains, infact I need an adapter for three pin as well !

Before screwing all together it got the obligatory coating of Dinitrol and kurust around the cuts. 


View of socket just under the bonnet.


Cable routed through floor and a couple of convenient holes above the exhaust

There was a plastic cover to the nearside by the tyre hanger so I routed the cable into that then back to the plug. I also drilled a couple of holes in the plastic either side of the exhaust hanger and secured the cable with a couple of zipties. Again this secured the cable away from the exhaust and stops any rubbing.

Thursday 28 July 2016

What a bloody mess!

Spent most of afternoon finishing mains wiring, just need to attach seperate earth point which is hanging. I forgot ! Then ran gas pipe for Propex Heater easy enough bending 8mm by hand over the wheel arch. Then just used pipe bender for a couple of bends to align with input at heater end and a 90 deg. bend which takes it under the rear of the floor to the nearside where the bottle will be, and then on to kitchen.
I then lagged it with the bubble wrap insulation leaving the joints free until it's all tested.

Bit o wiring!

Decided to drop the electrics down low as we are putting a loo in that corner ( old age catching me up!)
So there is a bit of wasted space down behind where the loo will sit. So I now have a much better space above to fit a shallow cupboard above. I've left the solar panel control up there as that will be the only thing that might be checked regularly.

Just noticed the solar control, it is straight honest! Ha ha 

Tuesday 26 July 2016

We have solar lighting!

Nearly have the rear offside panel secure, but broke my last small drill bit!
Why is it that there is only four pre drilled holes to avoid yet I managed to hit two!
So as I can't be bothered to go to local b&q ( already been to two trying to get 3mm ply)  I decided to mount the solar panel control box and hook the LED lights into it, the power supply was from main battery on a temporary fix. So I had the choice of hooking them into leisure battery or solar.
Six LED 's are only drawing 0.1 amps when all on which will hardly happen as they are very bright. So they can stay hooked into the solar panel so we can see if they would better on leisure battery or not.
Learning something everyday!!!

Monday 25 July 2016

Foil back to rear panel

For some reason the picture didn't upload and on Android you do not seem to be able to add photos !!!

Covering the offside back panel

Made a start on the offside rear of the van, I am almost done at the front a little bit of painting the trim around the floor.
But it's usable as a four seated and four sleeping.

So before I carry on with the suede lining I wanted to panel the back to enable me to mount the electrics and connect the batteries etc.

I used 3mm ply for this using the lower oem panel as a template. The upper sorted by cut a bit and try it!

Once cut to shape I sanded the sawn edges the as a had some of the carpet lining left from the roof bed I decided to cover it instead of leaving it plain ply.
I've also covered the back with foil insulation.
The nearside who knows, not enough carpet but by carpeting the offside I don't have to put any backing on the units. The kitchen side I will be running pipes etc and above the unit we are opting for a perspex sheet.

Friday 22 July 2016

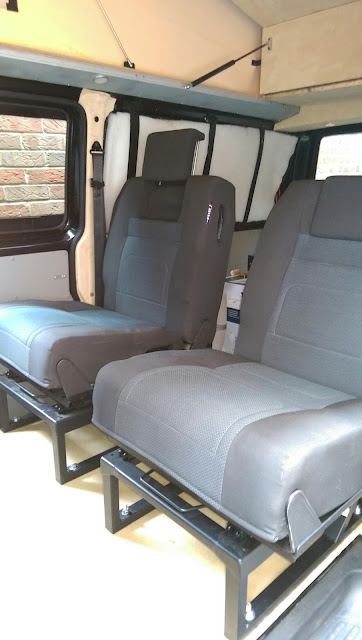
Second seat in !


Second seat fixed in place and all the panels are replaced under the van!

Van 1 me 1

Have a lovely lump on my forehead from sliding door !

This panel has to be "dropped" to be able to get at bolt that holds fuel pipe neck in place (4 torx screws )
Not sure why this picture is here, except it shows breather pipe! 
See bolt at top 10mm the earth strap is part of the washer and stays in place, sensible!
Breather pipe exits through plastic panels, for reference when putting back together

Lowering the fuel tank wasn't a problem , I had more or less convinced myself that it was going to be a pain! Just supported the tank with Jack and some wood. Undid the three tank supports then gently lowered it until I could see under. Drilled my last to bolt holes then lowered it a little more to get at the bolts. I fitted the bolts by putting them up through the floor rather than from inside the van that way the longer threaded part was inside the van. I was worried that they might rub on the tank, having fitted them and looked I had nothing to worry about! But better safe than sorry!

Seats will be upholstered around September so I will get on with the lining. At this point in time we're going for a cream leather close as we can get to the lining, with a jazzy 70'ish cloth in the middle to continue the retro feel . But who knows as my wife could change her mind! It also gives my account time to recover as I've been collating parts ( fridge, two burner hob and sink Smev, small oven / grill Smev, emergency loo, proper heater ) in the sales and saved a goodly sum! But I can build the units at leisure. 
With the beds done the solar panel in and charging the leisure battery we could use the van. Just need to ply line the the back and mount the electrics so we might go down to Cornwall for a week who knows!! 


Friday 15 July 2016

C Post lined

First attempt at lining the frame work! Not that easy either!
Ended up sticking a small area just below seatbelt top mount and flat then worked down and around sides. When that was done did the edges.

I had already covered the panel that sits behind the inertia reel except I forgot to cut away a piece to allow it to sit behind the inertia reel ! 

Learning all the time! 

Now just need to source some cream coloured panel clips to replace the grey ones!

Offside done today 16/07/16

Wednesday 13 July 2016

Stage One completed!


Roof bed covered in wheat carpet on top where bed will be and suede for the headlining and ready to be installed 


 And the Hatch

Bed in place! A bit of jiggery pokery needed to sort the rear bolts as the upper carpet and the lower suede put the bolt holes off a little but sorted it nicely


And gas lifts working nicely